Add and edit users
Table of contents
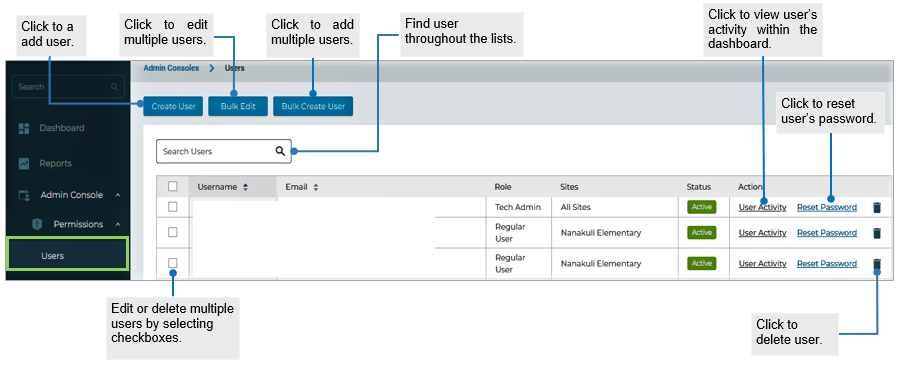
Users
-
Add a user
Required role: Tech Admin
In the left pane of the Dashboard window, click Admin Console. If you do not see Admin Console, you may not have the right admin permissions; please contact your tech admin.
- Click Permissions > User.
Click the Create User button.
-

- Enter the required information.
- The user’s name, email and role.
- The email address must be valid.
- Select the user roles. User roles determine which sections a user has access to and which tasks they can perform.
- Click Create.
The new user receives an email that includes a link to the web application, username and password.
Add multiple users
Required role: Tech Admin
In the left pane of the Dashboard window, click Admin Console. If you do not see Admin Console, you may not have the right admin permissions; please contact your tech admin.
- Click the Bulk Create User button.
Click Select File, and upload the CSV.
-

- Map the CSV fields. Click on the Disclosure drop-down arrow.
- In the ‘CSV Header Row’ column, find the field which contains your users’ first names — select ‘First Name’ from the drop-down list in the ‘Mapping’ column.
- In the ‘CSV Header Row’ column, find the field which contains your users’ last names — select ‘Last Name’ from the drop-down list in the ‘Mapping’ column.
- In the ‘CSV Header Row’ column, find the field which contains your users’ role — select ‘Role’ from the drop-down list in the ‘Mapping’ column.
- In the ‘CSV Header Row’ column, find the field which contains your users’ email addresses — select ‘Email Address’ from the drop-down list in the ‘Mapping’ column.
- In the ‘CSV Header Row’ column, find the field which contains the status — select ‘Status’ from the drop-down list in the ‘Mapping’ column.
- In the ‘CSV Header Row’ column, find the field which contains your users’ phone — select ‘Phone’ from the drop-down list in the ‘Mapping’ column.
- Once you’re done, click the Create button.
Edit multiple users
Required role: Tech Admin
In the left pane of the Dashboard window, click Admin Console. If you do not see Admin Console, you may not have the right admin permissions; please contact your tech admin.
- Click Permissions > User.
- To select user(s), check the box to the left of the username.
After selecting the user(s), click the Bulk Edit button.
-

- Update the user’s information.
- Once you’re done, click the Update All button.
Delete multiple users
Required role: Tech Admin
In the left pane of the Dashboard window, click Admin Console. If you do not see Admin Console, you may not have the right admin permissions; please contact your tech admin.
- Click Permissions > User.
- Select user(s) to edit/update from the list of users.
- After selecting the user(s), click the Bulk Edit button.
- Click the Delete All button.
Delete a single user
Required role: Tech Admin
In the left pane of the Dashboard window, click Admin Console. If you do not see Admin Console, you may not have the right admin permissions; please contact your tech admin.
- Click Permissions > User.
- Find the account that you want to delete. You can use Search and select the user you want to delete.
- Hove over the user you want to delete and click the Trash bin button located at the right most of the window, then Confirm.
View user activity
Required role: Tech Admin
The Dashboard keeps track of a user’s activities. It logs the dashboard visited and logged in time. In the left pane of the Dashboard window, click Admin Console. If you do not see Admin Console, you may not have the right admin permissions; please contact your tech admin.
- Click Permissions > User.
- In the Users list, find the user.
- Under the Action column heading, click User Activity. It will take you to a page where you can view the user activity.
Reset a user’s password
Required role: Tech Admin
In the left pane of the Dashboard window, click Admin Console. If you do not see Admin Console, you may not have the right admin permissions; please contact your tech admin.
- In the Users list, find the user.
- Hove over the user you want to reset the password for and click Reset Password. The user will get an email notification containing the temporary password.